I struggled muddling through all the forum posts for the best way to replace a ZFS drive in Proxmox, so here are my documented notes for how to do so - if you ever need to unfortunately do so.
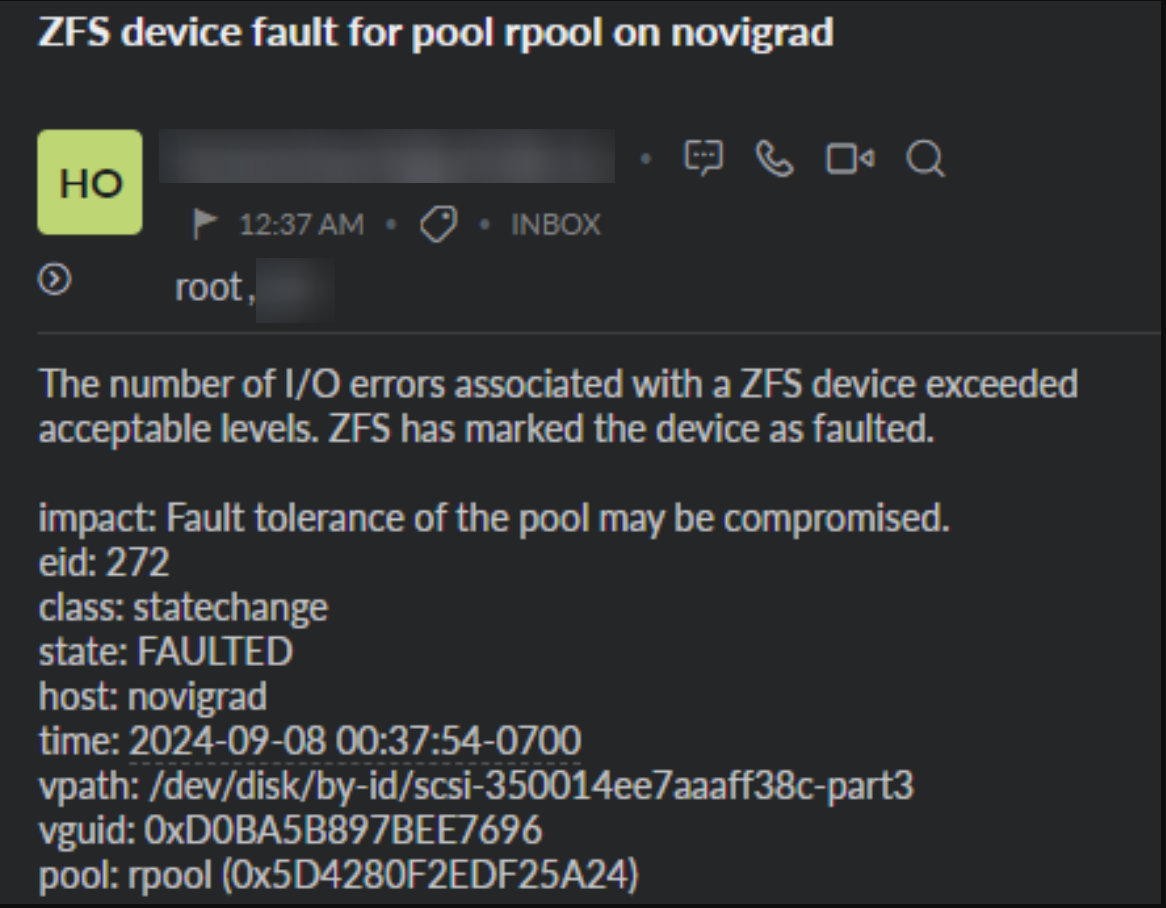
So you’ve got an email like the one above, and it’s time to replace the drive in your ZFS pool in Proxmox. Let’s go through how to find the drive that’s dying, replacing it, matching the parititons of the other drives, and getting it to resilver.
Finding the bad drive
Let’s start by running the following command on the machine with the dying drive:
zpool status -P
You should see output similar to this:
But what the heck is /dev/disk/by-id/scsi-350014ee7aaaff38c-part3? That doesn’t look like the normal /dev/sdX format. It turns out that this is best practice for referencing disks in a ZFS pool. This is because if you have a 3 disk pool consisting of /dev/sda, /dev/sdb, /dev/sdc, with a hot swap of /dev/sdd - if you take out the drives (or reboot), you don’t want just the first 3 drives that woke up (of your 4 installed drives) to be the main part of your pool with the “last” drive to wake up being your hotspare. That’s not going to make for a good time.
But how do we go about finding what disk this actually is? By running the following command and then following the symlinks:
ls -l /dev/disk/by-id/
You should see output like the following:
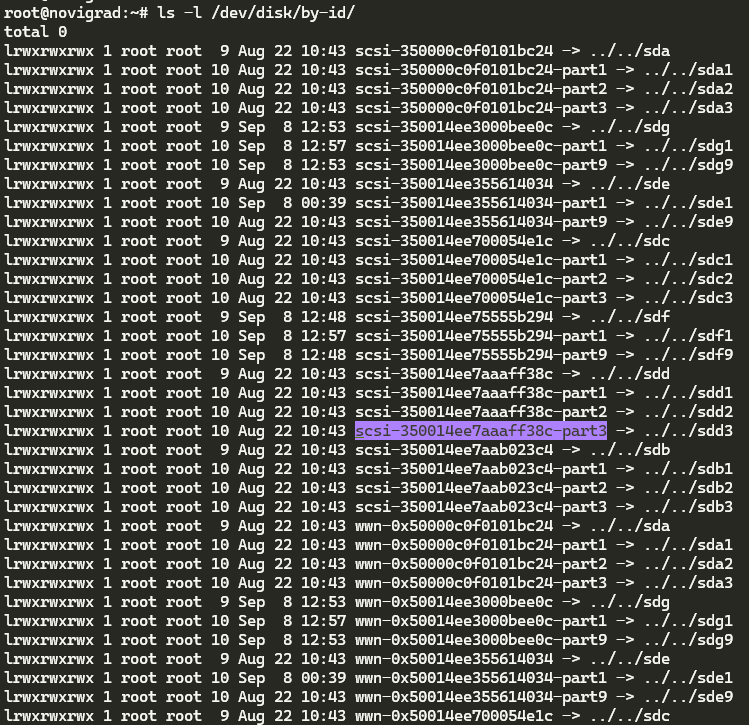
So now we know that the dying drive is /dev/sdd. But which bay is it in, or what’s the serial number of the drive so I know which one it is? You’ll want to run the following command, replacing /dev/sdd with the actual /dev name of the dying device (in my instance it’s sdd):
smartctl -a /dev/sdd
You should then see output like the following:
Cool, so we know that it’s a SAS drive with the serial number EA01PB20AM331105 and the product ID EG0600FBDSR. Let’s go ahead and offline the “bad” drive in the ZFS pool with the following commands (making sure to replace scsi-350014ee7aaaff38c-part3 with the actual name of the dying disk):
zpool offline rpool scsi-350014ee7aaaff38c-part3
Physically replace the drive
Now, if you have the extra bay/caddy/drive, you should go ahead and physically put it in the server (as long as it supports hot-adding drives, and if it doesn’t, you’ll need to shutdown, add the drive, then turn it back on). If you don’t have an extra bay/caddy/drive, you’ll need to shutdown your machine and physically remove the “bad” drive.
If you are running your Proxmox on an HP/Dell machine, this is where iLO and iDRAC really come in to to help. You’ll want to login and check which bay this drive is in. If you are running this on another machine, you now have the fun job of finding out where that drive is, in your machine.
Find the new drive and format it
With your new/additional drive now installed on your Proxmox, and Proxmox is now running - let’s see where that new drive is. My favorite way of doing so, is logging into the Proxmox GUI, clicking on the server (“node”), and then checking which disk (or disks in the below image) aren’t partitioned:
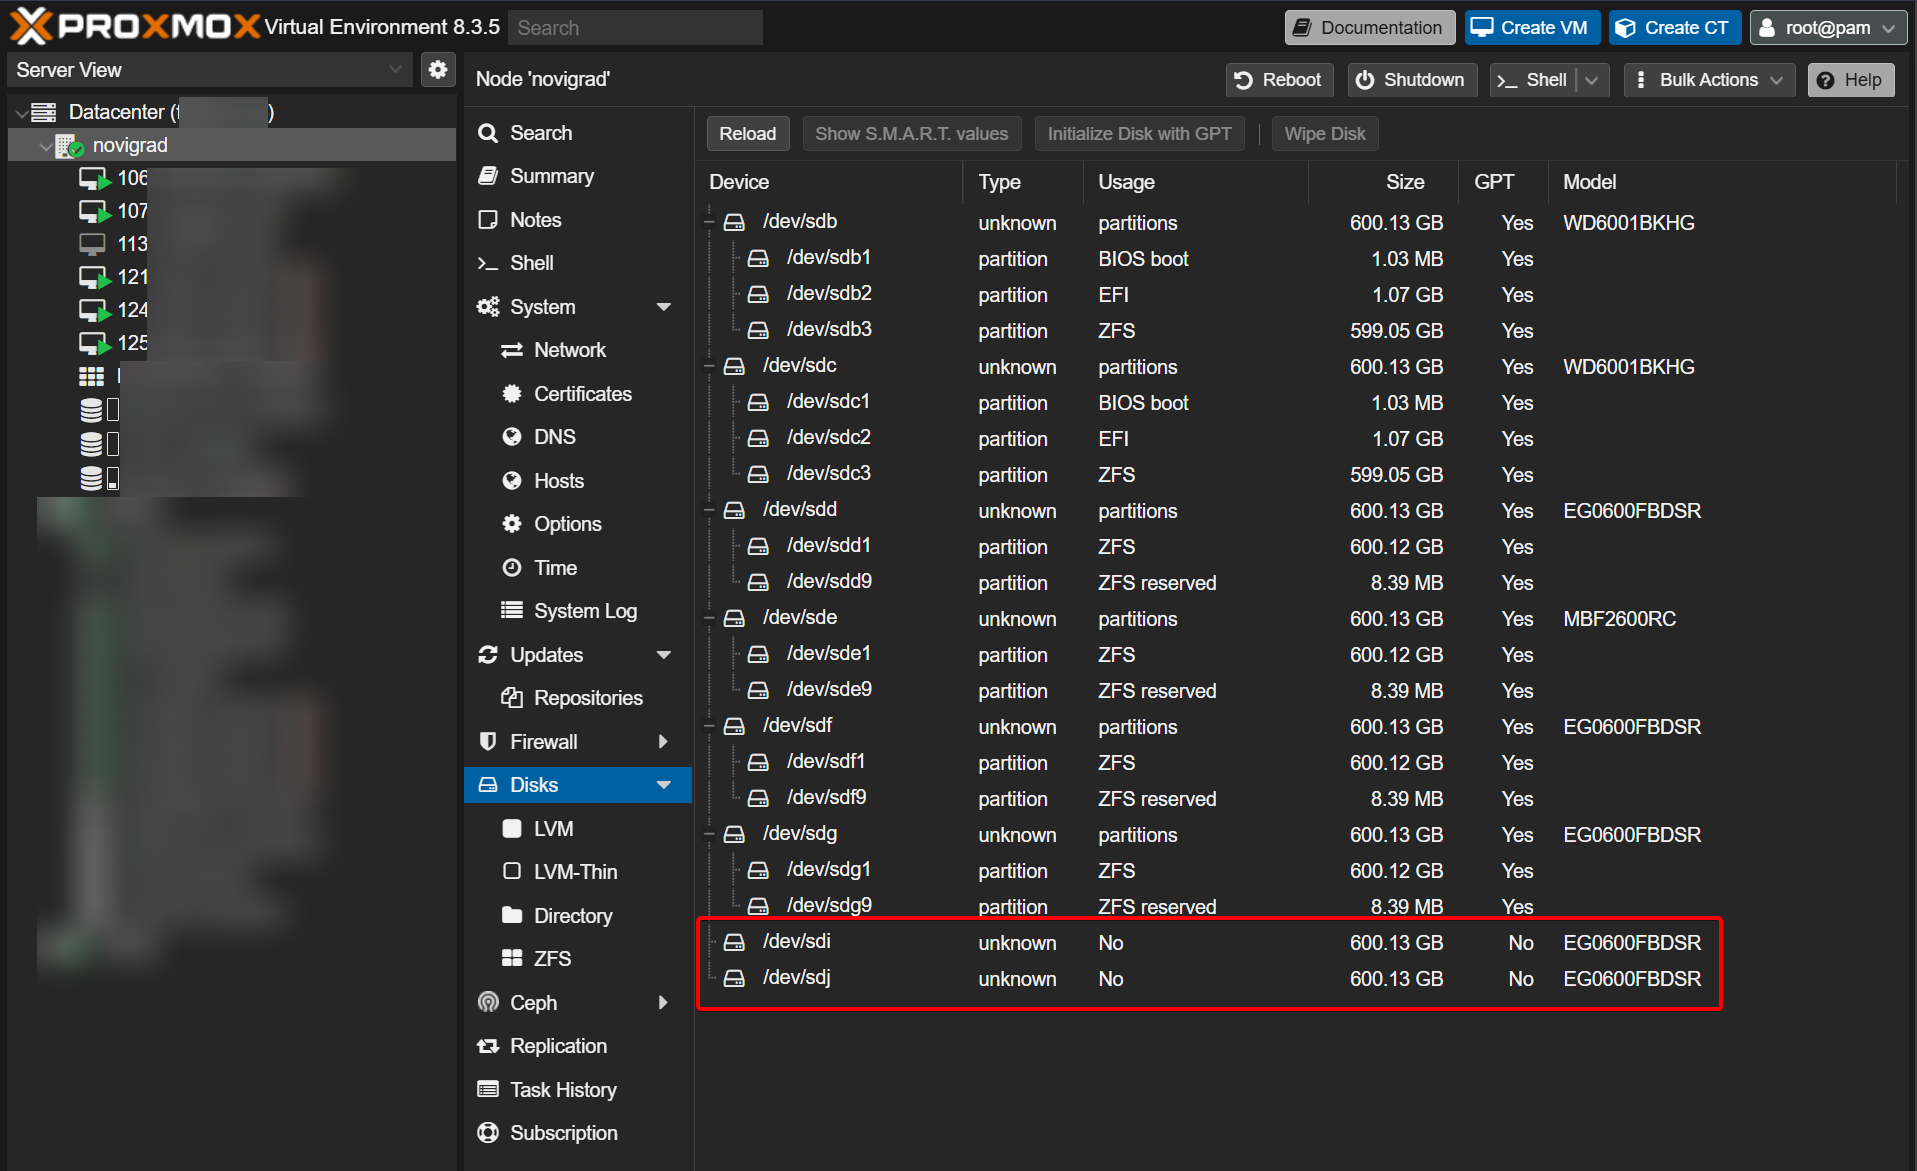
So in the above image, the newly added disks are /dev/sdi, and /dev/sdj since they’re marked with the column Usage of No. Obviously you will have just replaced (or added) a single drive, so you’ll only see one.
Now that we know the /dev device name of our new drive (let’s just pretend it’s the drive /dev/sdi), let’s create the partitions we need. Thankfully there’s a pretty nifty utility for us to use that will just go ahead and do the hard work for us in the form of sgdisk. In this example, I take the known “good” drive of /dev/sda, and copy all of the partition table information to the new/replaced drive that is at /dev/sdi:
sgdisk /dev/sda -R /dev/sdi
At least in my instance, there were 3 newly created partitions, with the 2nd partition being the EFI partition that the system uses to boot:

So since we know that the 2nd partition is being used as the EFI partition, and the 3rd partition is used for ZFS data (since it’s the largest and has “ZFS” as the marked usage), let’s go ahead and format/initialize it for our system:
proxmox-boot-tool format /dev/sdi2
proxmox-boot-tool init /dev/sdi2
proxmox-boot-tool clean
Getting the new drive in the ZFS pool
Sweet, the drives should now be ready to boot from, if they’re ever called upon to do so. Now let’s go ahead and add the drive back to the pool, to begin resilvering. We’ll need to run the following command again, to see what /dev/disk/by-id it recieved:
ls -l /dev/disk/by-id/
Which should output something like this:
So you’d want to get the ID of the “scsi” (or the wwn), which should be something like:
So now let’s replace the dying drive in our pool with the good one (yes, you should still use replace even if the drive isn’t connected anymore):
zpool replace rpool /dev/disk/by-id/scsi-350000c0f0101bc24-part3 /dev/disk/by-id/scsi-350014ee7aab023c4-part3
Then, running the following command:
zpool status -P
You should see output like this:
Resilvering will definitely take some time, so let it run. It took mine about 24 hours in total.
Then, once the pool has resilvered the data, if the “bad” disk still shows in the pool, we can detach it:
zpool detach rpool /dev/disk/by-id/scsi-350000c0f0101bc24-part3
And you’re done!